
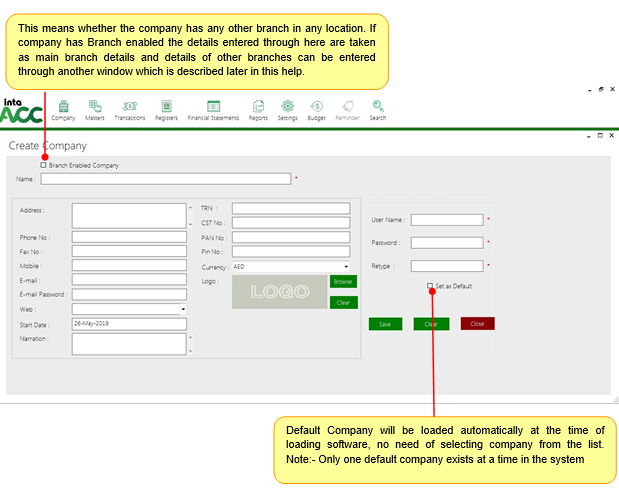
This is for creating a new company data base. Here company details such as name, address, email, phone etc can be entered. A super power admin is created while creating company. We can upload logo of the company if any and can set the currency of the company.
This is for creating a new company data base. Here company details such as name, address, email, phone etc can be entered. A super power admin is created while creating company. We can upload logo of the company if any and can set the currency of the company.
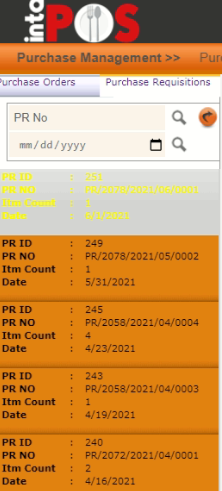
How to access PR?
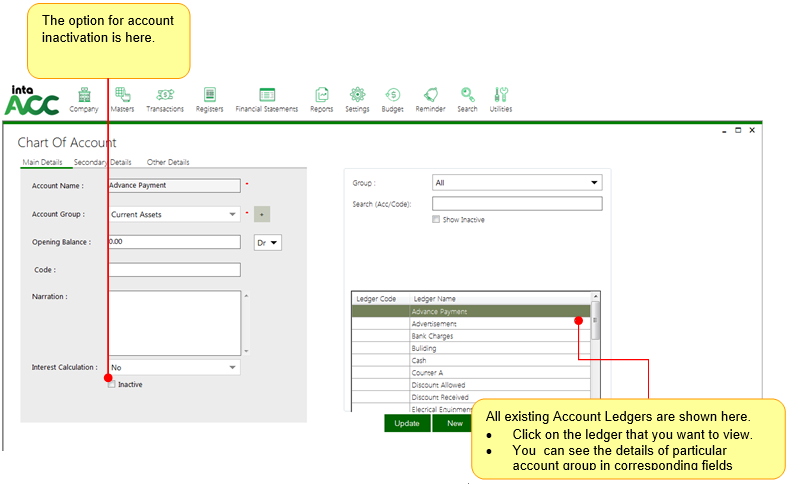
This is to create various account groups. Almost all groups for transaction are in-built in this software. These in-built groups cannot be edited or deleted.

Click on Masters > Accounts > Chart of AccountA window appears as shown below
Access: In order to approve the PO user needs to select the PO and then needs to select the approve button.
This is for creating various account ledgers under each group. A few in-built ledgers are already created, which cannot be edited or deleted
Click on Masters > Products > Product Group A window appears as shown below.This is to create various product groups.
This is to create depreciation or appreciation policy of each non-current asset. The window is shown as follows.
Policy Name: This is to enter the policy name of the particular fixed asset.
Here, it includes two methods of depreciation under the drop down as Straight line or Reducing balance method.
Mode: This means whether it is Depreciation or Appreciation
Account: In here, it needs to select the particular Accumulated depreciation account where the depreciation of the asset should be credited to. The account should have created before and once it clicked on the drop down then it appears all accounts which have been created. Then the user can select the particular account.
Period: Once the user clicked on here it appears a small grid as shown below.
Flat Rate: Instead of selecting a period, here is the option of entering a flat rate directly.
Save Button: Once it entered the all details, it can be save the details by click on this save button.
Clear Button: Once it clicks on here it cleared the filled details.
Delete Button: If need to delete a saved policy, by clicking on this delete button the user could be deleted.
Close Button: This option is to close the window.
Once the user went through the path, it appears the window of product creating as shown below.
Product Name: This is to enter the name of the particular asset.
Product Code: This is the system generated code for each asset.
Group: The user can select the asset the group here. Once it clicked on the drop down icon, it appears all fixed assets groups created. Incase if it has not been created the group, here also has the option to create the group. Once it clicked on + signs next to Group, it directed to the group creation grid as shown below.
Product group: The name of the group should enter here.
Under: This is under which account the Group comes from.
Account: The asset account which need to pass the asset value into.
Account: The asset account which need to pass the asset value into.
Is Asset: Once it has completed the above details, it needs to click on this option, if the created group is for fixed assets.
Brand: This is to create and select the Brand of the asset.
IMPORT: This button is to import Assets details into the system from a excel sheet. Once it clicked on here, the user directed to another grid where he or she could be done the adjustments.
CLEAR: The filled details could be cleared by clicking on here.
DELETE: Saved data could be deleted by clicking on here.
CLOSE: This is for closing the window.
This option is to enter the asset details which have been purchased in the previous financial years. Once it raised an open entry invoice the asset value just hit into the relevant reports and as well as for depreciation purposes. The interface of the open entry invoice is same as the purchase invoice only the difference it there is no PURCHASE ACCOUNT to be selected in the open entry invoice. All other details remain as it is.
This is to enter the details related to fixed assets sales or disposal. The interface of the vouchers as follows. The interface of the open entry invoice is same as the purchase invoice only the difference it there is no PURCHASE ACCOUNT to be selected in the open entry invoice. All other details remain as it is.
Invoice No: The invoice number is appeared automatically. Can customize.
Customer: Here, the customer is the party who going to purchase the asset. The customer could be selected from the drop down list. At the moments, when the sales invoice is generating also can could be created the customer by clicking on + mark next to Customer field.
Sales A/C: As the sales account, it needs to select the DISPOSAL LOSS/GAIN account here.
Sales Man: If it has an assigned sales man for the particular transaction, he or she can be mentioned here.
Date: The current date appears automatically.
Credit Period: If the company has decided to confirmed credit period, it can be added here.
Tax Type: Tax details can be selected here.
After filling above details, it can be entered the sales product details next.
Here also it has the options of Print after save and mail after save.
Once it raised a fixed asset sales invoice at the moment the following double entry pass related to sales amount.
Customer Account Dr
Disposal Loss/Gain Account Cr
After this step, it needs to approve relevant disposal invoice for calculating the disposal loss / gain. It can be done by going through the path mentioned below.
It needs to select the relevant sales invoice from here and then open it. At the bottom of the invoice there is a button called APPROVE. Once it clicked on here, it appears a notification message as follows.
It asks to process for depreciation. The user needs to click on Yes if need to approve the disposal. Once it clicked on yes it directed to the DEPRECIATION REGISTER. Then it needs to click on PROCESS button to run depreciation for the asset. After that it appears as “FIXED ASSET UPDATED SUCCESSFULLY”. Once it approves all, it passes following entries.
Disposal loss/Gain Account Dr
Accumulated Depreciation Account Dr
Fixed Asset Account Cr
Disposal loss/gain Cr / Dr
This option is to do the adjustments related to fixed asset revaluation. Once it go through the above path, it appears the window shown below.
Voucher No: Automatically loaded as sequence.
Doc No: If need to enter any document number, it could be added here.
Voucher Date: Current system date appears automatically.
Invoice Date: Invoice date need to enter here.
Currency type: The user can select the currency type here.
Voucher No: Automatically loaded as sequence.
Voucher No: Automatically loaded as sequence.
After filling above details, the user can enter the asset detail which is going to revalue.
I need to keep a note, and then it could be added under the Narration box.
Once it clicked on the “print after save” option, the print will be loaded.
After filling all details it could be clicked on SAVE button, to save the invoice.
Once it saved, it needs to do the approval, for passing account entries related to revaluation.
For that, it needs to go fixed asset register and select revaluation invoice as the way it done on disposal approval.
Once it went through the path, it loaded the shown window below. It provides a summary of all Fixed assets transactions which have been done. The user can filtered the required date and then see the summary of each transaction type in the register
Location: Holiday Settings
>Holiday Settings window is facilitating to select the particular date to set the respective holiday. When user selects the date it is highlighting in yellow color and activates the “Narration” option. In Narration option user can describe the reason for the holiday. After setting all the details user can save the entered data using save option.
Location: Loan
This form facilitates to feed data, if the company maintaining a loan management process for their employees and run the process automatically.
Branch drop down list supports to select the respective branch from the list.
Voucher No text box supports to enter the number of the loan voucher.
A date select box support to select the respective date of the loan is going to issue.
Employee drop down supports to load the respective employee of the branch. And using the plus button action near to the Employee drop down can use to add the new employee to the master table.
Amount text box supports to enter the amount of the loan.
Loan Account supports to select the respective account for the loan.
Start Salary Month supports to select the month that requested loan amount is going to be deducted.
Then there are options to select Cash / bank Account, Cheque number, Cheque date, and the Narration
After entering the entire data user can select Save action to save the entered data. Without entering the compulsory data with red colored asterisk mark user is not allowed to save the entered data.
Location: Advance Payment
This windows use to enter the advance payment details of an employee. If an employee request for an advance the Advance Payment window can use to enter the required data.
Here Date text box uses to enter the date of the advance payment.
Employee dropdown supports to select the relevant Employee.
Salary Month to enter the respective salary month to deduct the paid advance from the employee salary.
Cash / Bank A/c drop down box uses to select the respective chart of account.
Cheque No: text box to enter the number of the cheque.
Cheque Date: text box to enter the date of the cheque.
Narration is to keep a note if needed.
Name search option supports to search the Name of the employee with Advance Payment status.
Location: Salary Voucher
This window supports to filter the Employees Code, Employee Name, Basic Salary, Food Charges, Function Deduction, Mobile Allowances-Dialog, Internet Charges, Seasonal Allowance, Fixed Allowances, Test, Factory-Basic, Factory-Attendance Bonus, Allowances, Factory-Fixed allowance, Factory-Loan deduction, Factory-Allowances, Commission, Loan, Welfare, Leave Allowance, Diesel Allowance, Transportation, Sales Commission, Bonus, Deduction, Allowance, LOP, ETF, Com. EPF, Emp. EPF, OT, Salary and Status using Designation, Date, Month and Employee Code parameters.
Using the Pending and Approved ratio options user can approve or keep pending the Salary Voucher.
Narration text area supports to enter any kind of information relevant to Salary Voucher.
Under the Salary Voucher table system displays the Total and Paying Total.
Location: Pay Slip
Here the system generates the pay slip of the selected employee.
Salary Month enters the month of the salary.
Employee dropdown box supports to select the relevant employee.
There are three options under the Employee dropdown toggle menu such as All, Active and Inactive.
If user selects All option the Employee dropdown toggle menu displays all of the employees in the company.
If user selects Active option, the Employee dropdown toggle menu displays all of the active employees in the company.
If user selects Inactive option, the Employee dropdown toggle menu displays all of the inactive employees in the company.
Narration is to keep a note if needed.
Name search option supports to search the Name of the employee with Advance Payment status.
Location: Bonus Deduction
This window supports to filter the Employees Code, Employee Name, Bonus, Deduction and Narration using Designation, Date, Month and Employee Code parameters.
After retrieved the data user can check the status of the Bonus Deduction of the employees.
Remove option to the selected row from the table.
Under the table of the Bonus – Deduction window displays the Bonus Total and the Deduction Total.
Cash / Bank A/c drop down box uses to select the respective chart of account.
Cheque No: text box to enter the number of the cheque.
Cheque Date: text box to enter the date of the cheque.
Narration is to keep a note if needed.
Name search option supports to search the Name of the employee with Advance Payment status.
Location: Bonus Deduction
Window supports to select From Date, To Date, and Employee, Month, Branch, Currency, report
exporting type and radio option to select Bonus or Deduction.<> After select the required fields the system generates the Payroll – Bonus Deduction report.
The login window appear first when you trying to log in to the PRODUCTION module. Enter valid user name and password to login as shown below.
After logging in to the system by using valid user name and password, this main window will appear. This is shown below. You have the option of using the Production module on this main dashboard. As well as this window provides you the option of logging out, when you need to log out from the system.
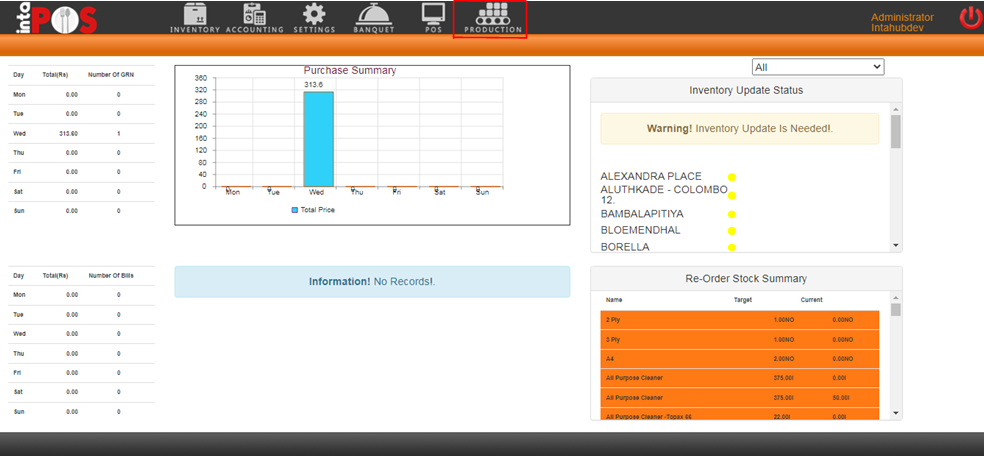
The following things are contained in our Production module
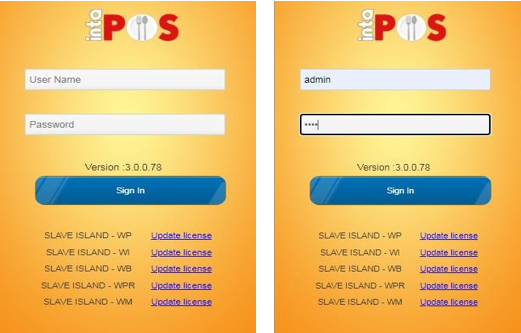
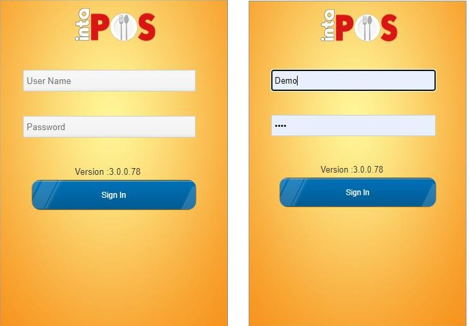
Use the login window to access the retail POS system. Select the user from the left side panel and provide the proper password.
If provided password is correct, the system will display this page.
>The user should enter the cash drawer amount and open the shift. If all goes well user will be able to see the above screen.
When user press the logout button system will promote another window to close the shift.
The highlighted areas are the functions of the POS system.
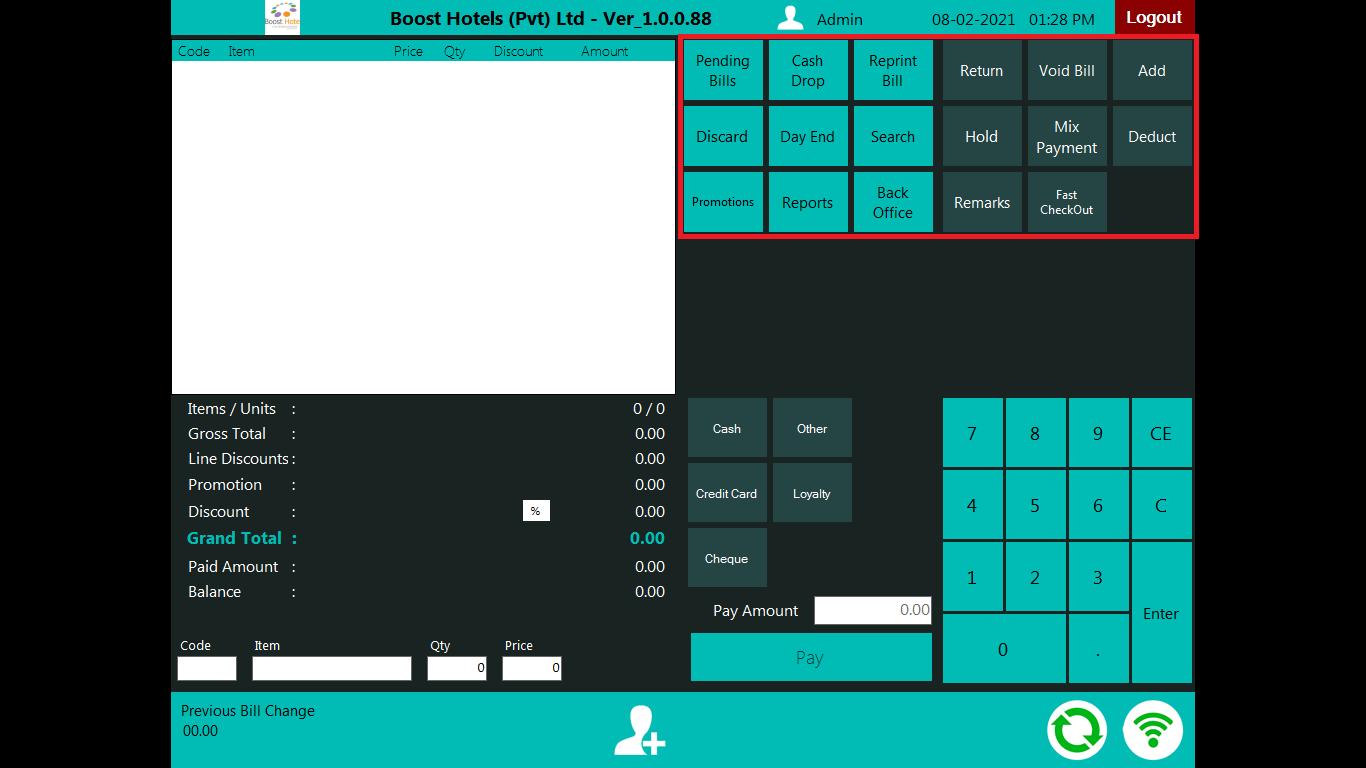
The logged users name will be display here and the systems date and time will display there.

The logged users name will be display here and the systems date and time will display there.
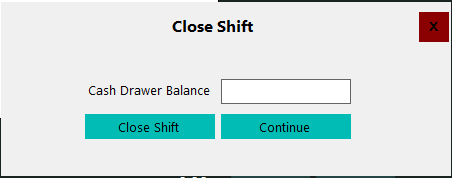
The user can logout the system without the closing the shift and if user need to close the shift, user must be enter amount and close shift.
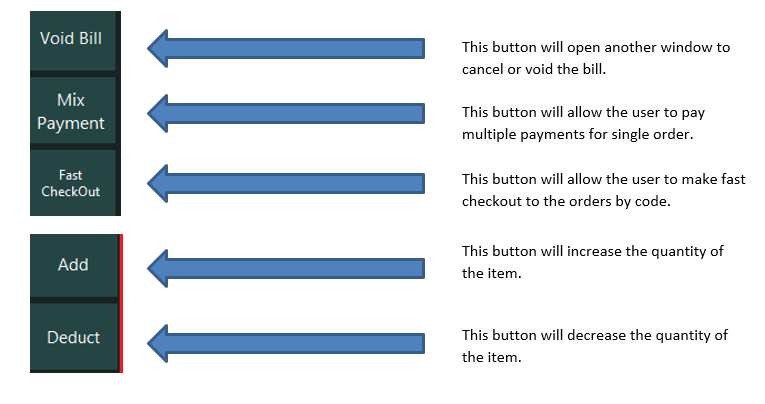
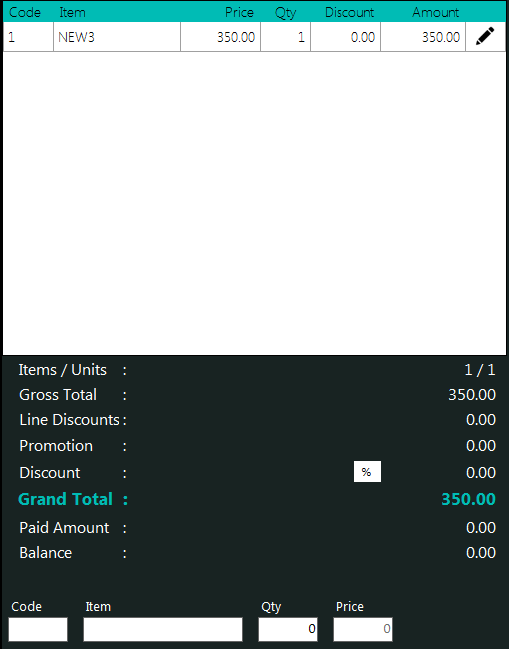
The above image shows the order panel and the amount description
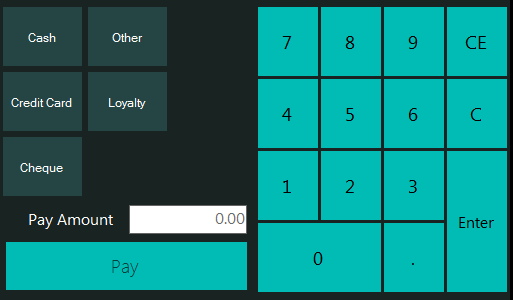
The above picture shows the payment methods and the payment panel.
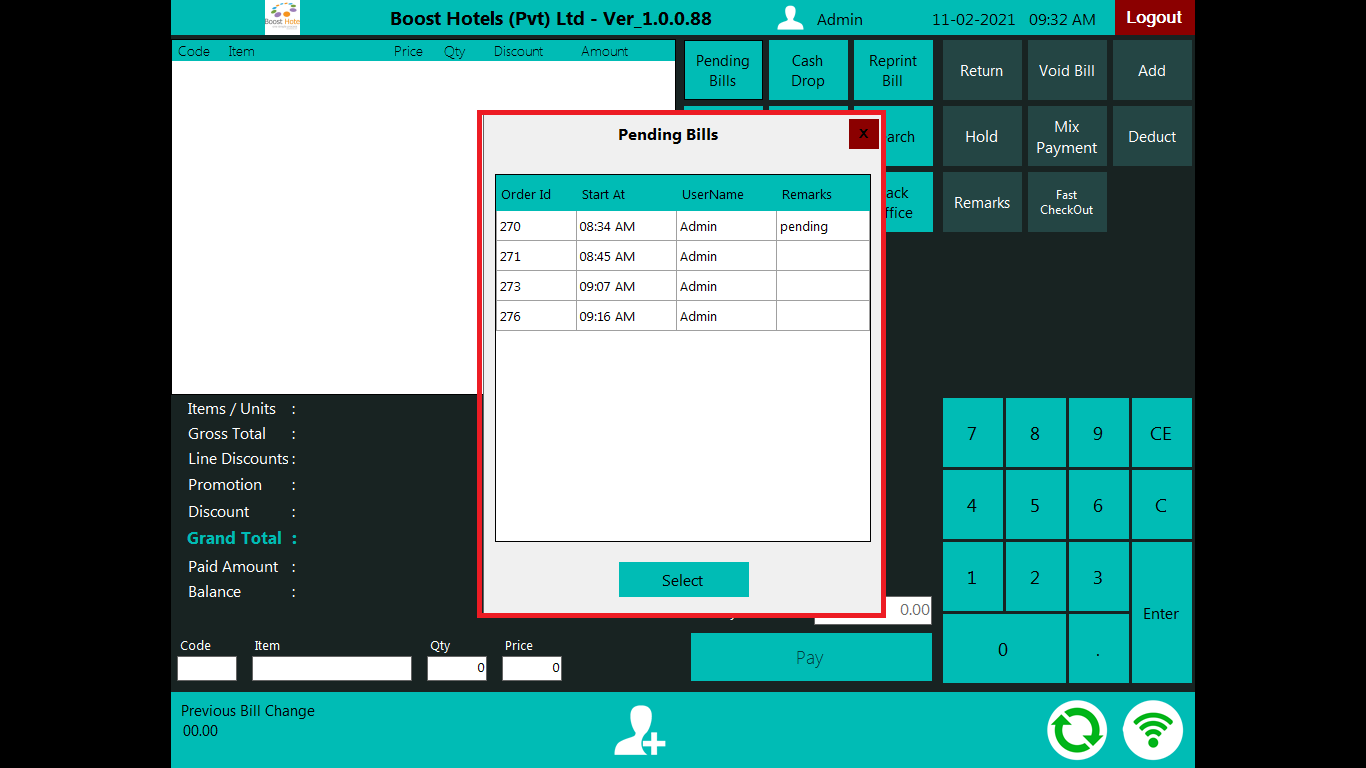
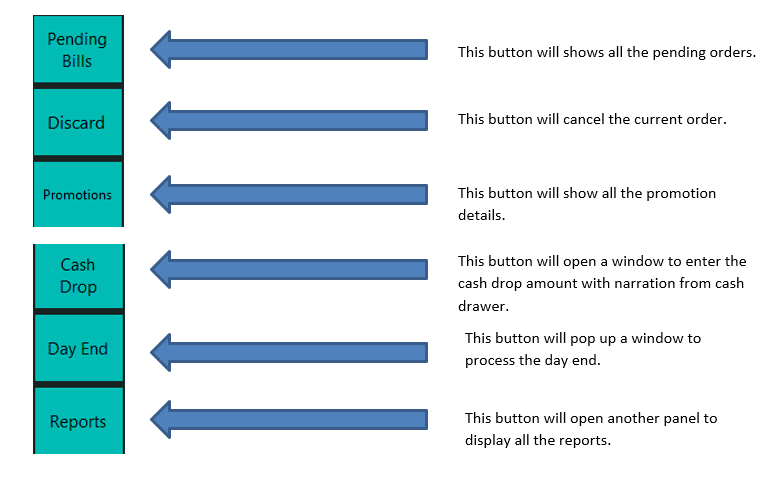
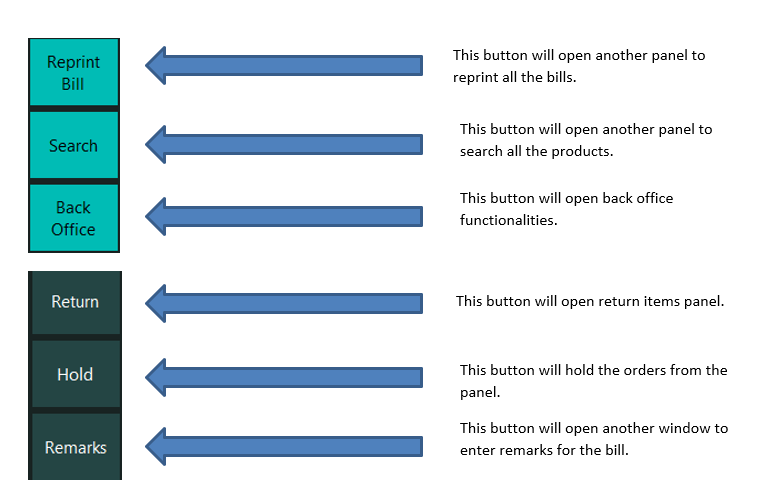
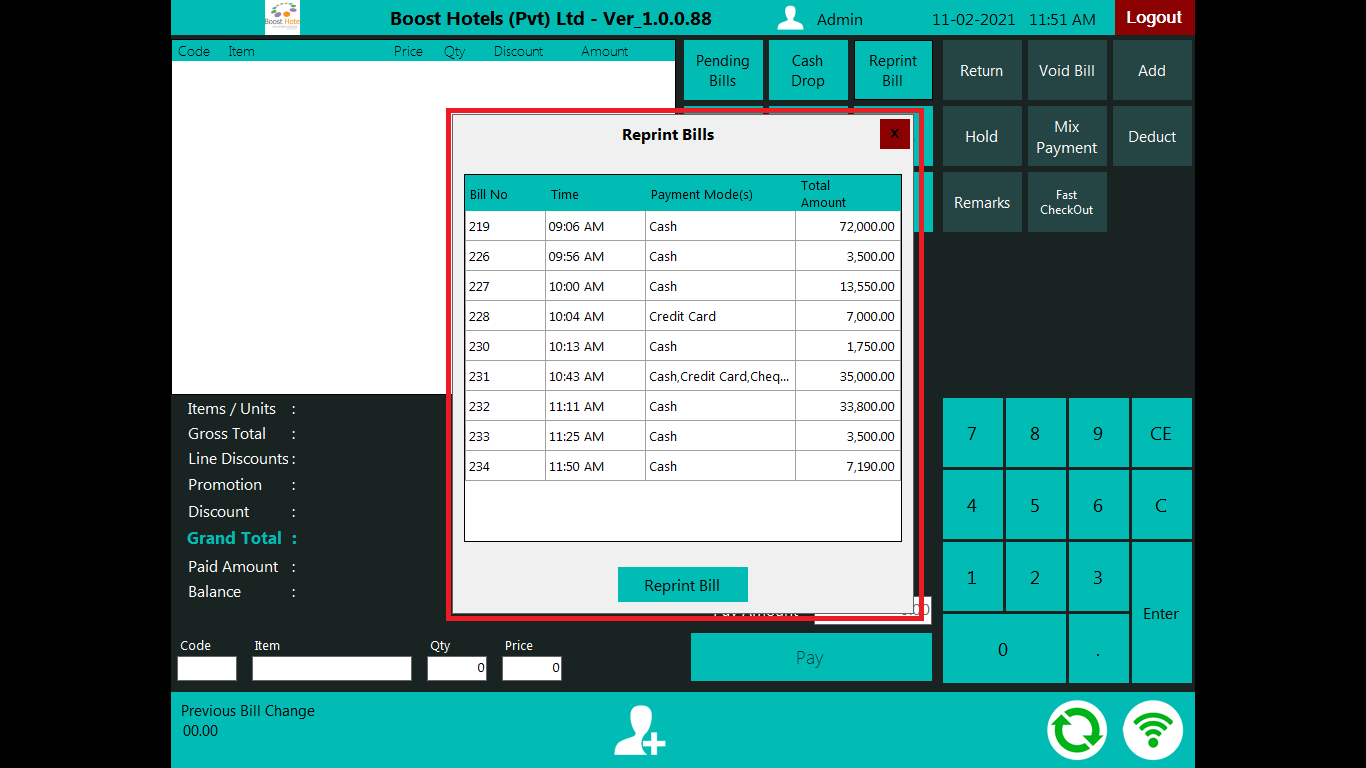
When user presses the reprint bill button, it will open the window to select all the previous bills to reprint it. User needs to select a bill and then he needs to press reprint bill button. The bill will be print with indicating duplicate copy on top of the receipt.
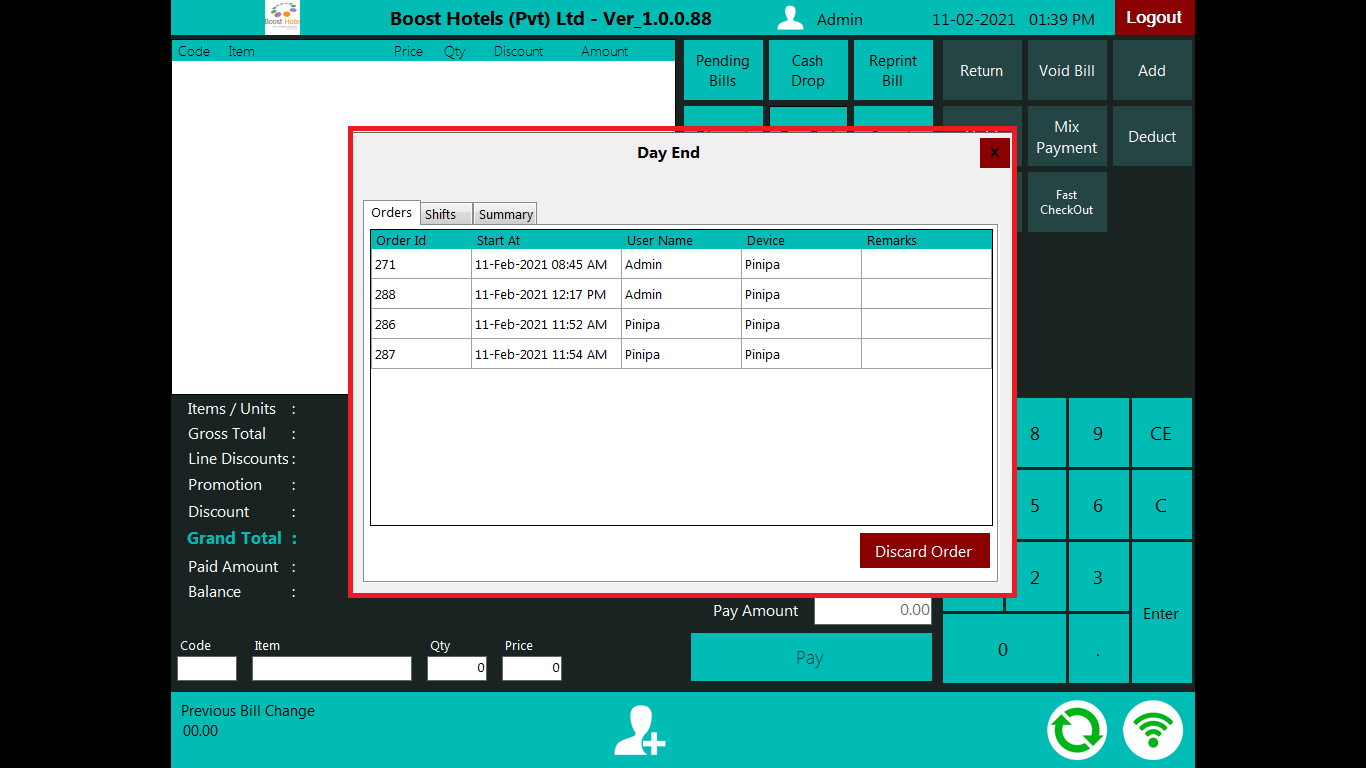
When user press the day end button it will open a display and it will show all the pending bills, opened shifts and summary details of sales.
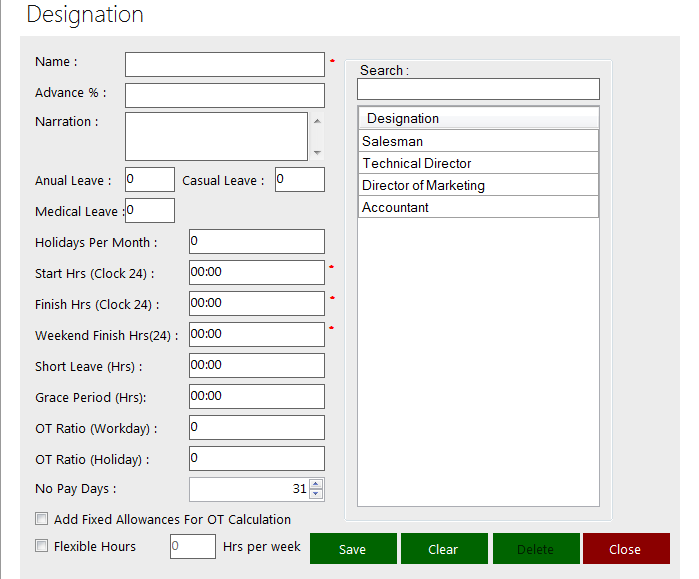
Location: Payroll >> Designation
Name text box uses to enter the Name of the employee.
Advance % text box uses to enter the Advance percentage of the designation. For an example, when designation level is increasing the Advance percentage also increasing.
Narration is for taking some notes related to the employees.
Leave Type there is three types of leaves as Annual leave, Casual leave, and medical leave.
Holidays per month allowed number of holidays is state here.
Start Hrs (Clock 24) text box uses to enter the starting time of the work.
Finish Hrs (Clock 24) text box uses to enter the finishing time of the work.
Weekend Finish Hrs(24) text box uses to enter the finishing hour of the work in weekend
Short Leave (Hrs) text box uses to enter the number of short leave hours.
Grace period (Hrs) uses to enter the grace period of the day. For an example allow for 15 minutes’ delay to the work.
OT Ratio (Workday) text box uses to enter the defined OT Ratio for a Workday. The OT ratio needs to calculate as follows.
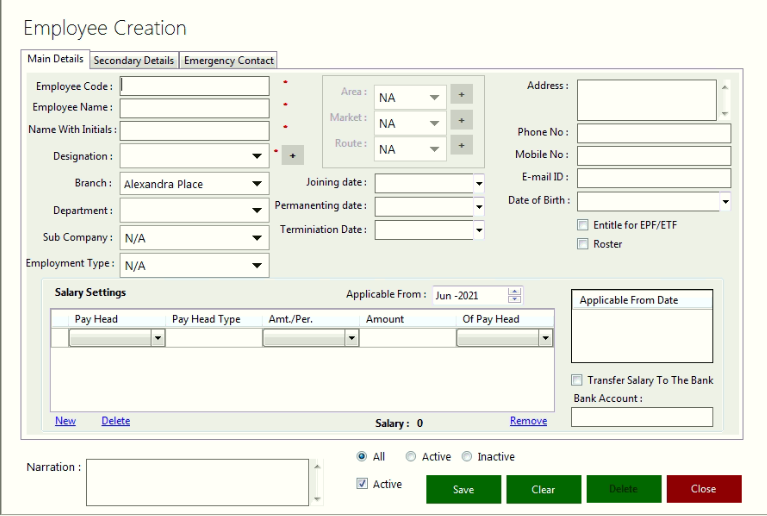
Location: Payroll >> Employee Creation
Employee Code text box uses to enter the unique code of the employee.
Employee Name text box uses to enter the Name of the Employee.
Name with Initials uses to enter the name with initials.
Designation text box uses to enter the type of the designation of the employee.
For selecting the Branch, Department or the Sub Company options are there.
Employment type could be selected from the drop down list.
Date of Birth to enter the date of the birth of the employee.
Marital Status text box uses to enter the status such as married or single.
Gender text box uses to enter the gender.
Qualification text box uses to enter the qualifications of the employee.
Blood Group text box uses to enter the type of the blood group of the employee.
If user selects the designation as Salesman the Area, Market and Route option will activate.
Joining date text box uses to enter the employee’s joined date to the company.
Permanenting date text box uses to enter the employee’s permanenting date of the company.
Termination date uses to enter the employees terminate date of the company.
Address text area uses to enter the address of the employee.
Phone No: Mobile / No: E-mail ID text boxes are used to enter the respective phone number, mobile number and email address of the employee.
If an employee is entitled for the EPF /ETF needs to check the Entitle for EPF / ETF checkbox
Salary Settings Box uses to enter the Pay Head, Pay Head Type, Amt. / Per., Amount, Of Pay Head.
Here of Pay Head Means Name of the Pay Head uses to allocate the Pay Head of the same row of the Salary Setting text box.
Applicable from text box uses to enter applicable date of the entered Salary Settings.
Total Salary will display under the salary settings.
New option uses to add new Salary Settings for particular employee.
If user adds new Salary Setting the old Salary Setting will display on Applicable from Date box.
Delete option to delete the Salary Settings
Remove Option to remove the selected row of the Salary Settings
If user needs to transfer the employee salary to the bank can check the Transfer Salary to The Bank check box and in Bank Account text box needs to enter the number of the Bank Account
Narration option uses to enter any kind of required information.
There are three radio buttons under the Salary Settings such as All, Active, and Inactive.
Active check box uses to check whether the user is active or inactive.
Close action to close the Employee Creation window.
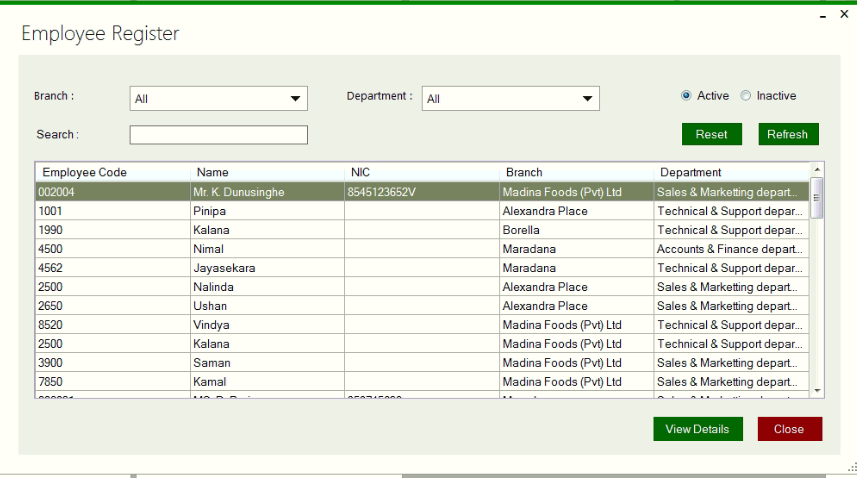
Location: Payroll >> Employee Register
Branch drop down supports to select the respective branch from the list.
Department drop down can use to select the required department of the respective branch
Search text box can use to search the employee using Employee Code, Name and NIC.
Active radio option supports to show only currently working active employees.
Inactive ratio option supports to show inactive and currently not working employees of the business.
Refresh action supports to refresh the content of the window.
View Details option supports to view the details of the selected employee.
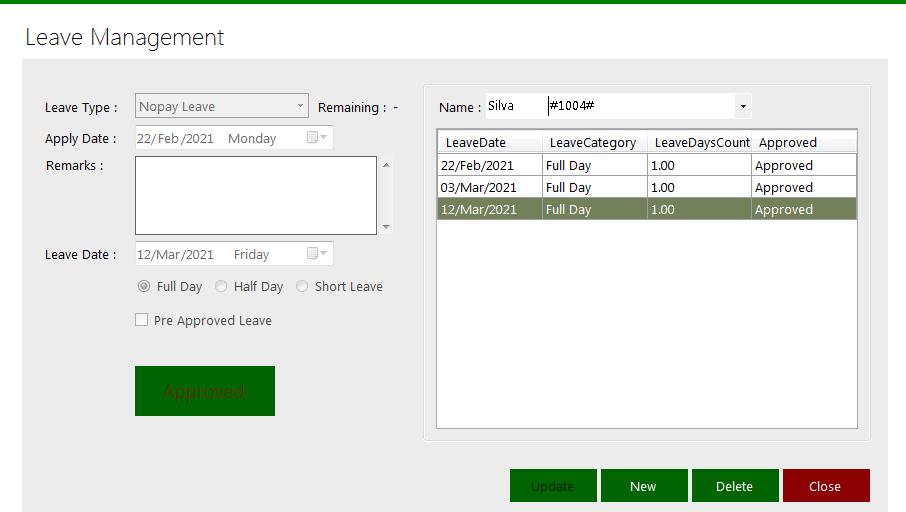
Location: Payroll >> Leave Management
Leave Type dropdown box uses to select the type of the leave such as No Pay Leave, Annual Leave, Casual Leave, and Medical Leave.
Apply Date box uses to enter the applied date of the leave.
Remarks text area uses to enter any kind of required information relevant to the Leave Management.
Leave Date uses to enter the required Leave Date of the employee.
There are three options under theLeave Date such as Full Day, Half Day, and Short Leave. The user can select any kind of option to enter the type of the leave.
Pre-Approved Leave check box can use to check whether the leave is pre-approved or not.
Name option can use to enter the name of the employee..
Under the Name text box table is displaying with Leave Date, Leave Category, Leave Days Count and Approved status. When use selects a respective row of the table the system displays all the relevant data such as Leave Type on the same window.
Location: Payroll>>Attendance Management
Once it licked on this, it appears the window below.
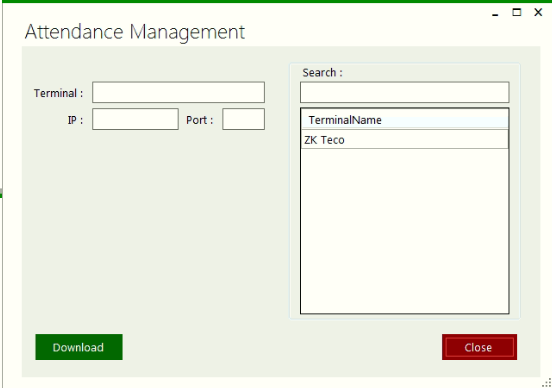
This is to download and see the finger print attendance data.
Location: Payroll >> Roster Management
Date select boxes use to select the date from date picker and enter the starting date and ending date.
Branch drop down uses to select the respective branch of the business.
Search option support to search employee by name.
Roster Type in Roster Allocation supports to select the type of roaster which needs to assign to the employee.
Schedule action supports to allocate the distinct rosters to working days of the company.
Roster Type in Roster Type box supports to add the new name of roaster type.
Short Code supports to enter the short code of the Roster Type.
Start Time supports to enter the start time of the roster
End Time supports to enter the end time of the roster
Save action support to save the roster.

Roster is a list or plan showing turns of duty for individuals or groups in an organization.
Purchase Requisition form
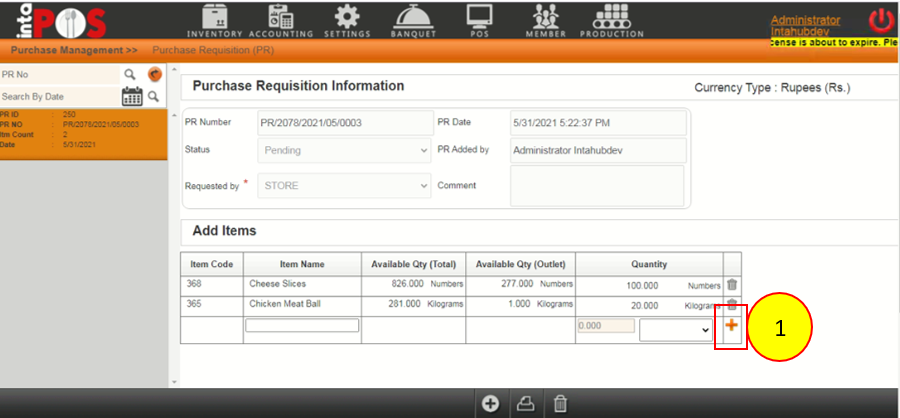
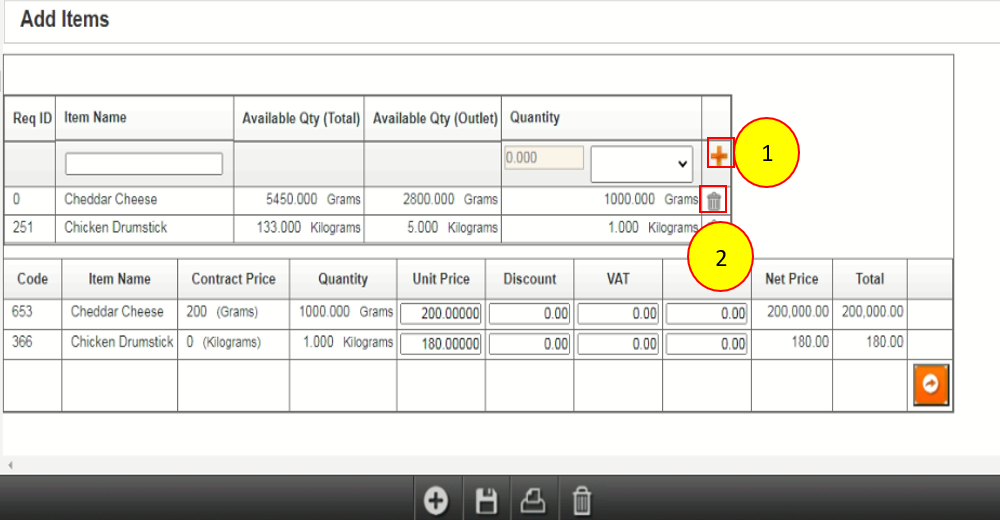
Fill all the required and item name press enter add quantity and select plus mark No.1 to add item to the table.
Mean: After making the purchase requisition the employee need to approve it or remove it or add more items to it.
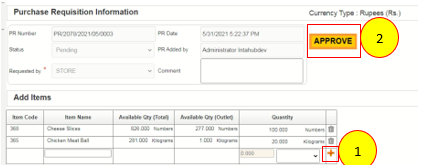
Select the required PR. Select the plus button No.1 to add more items and approve button No.2 to approve the PR.
Access: In order to approve the purchase requisition user needs to select the created PR and then need to select the approve button.
Location: Dashboard >> Inventory>>Purchase Management>> Purchase Requisition>>Approve
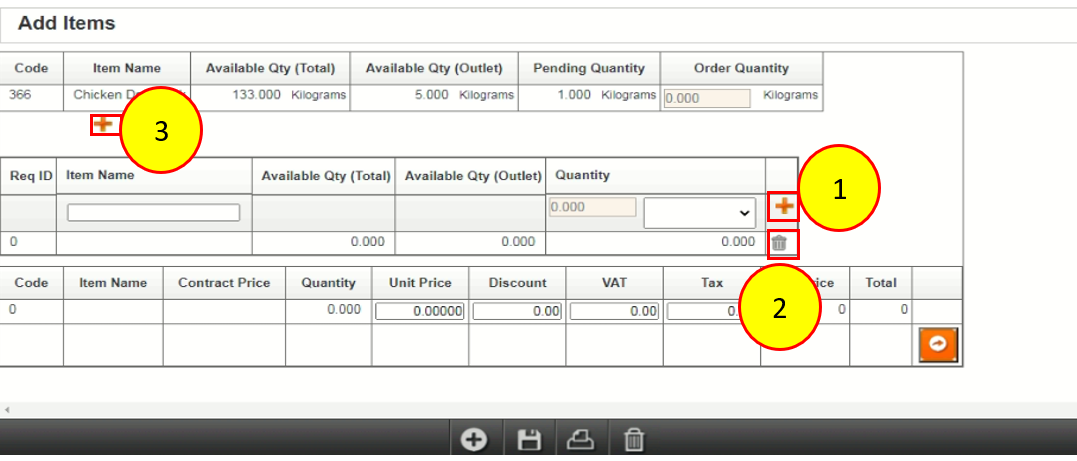
Mean:A purchase order is a commercial document and first official offer issued by a buyer to a seller indicating types, quantities, and agreed prices for food items.
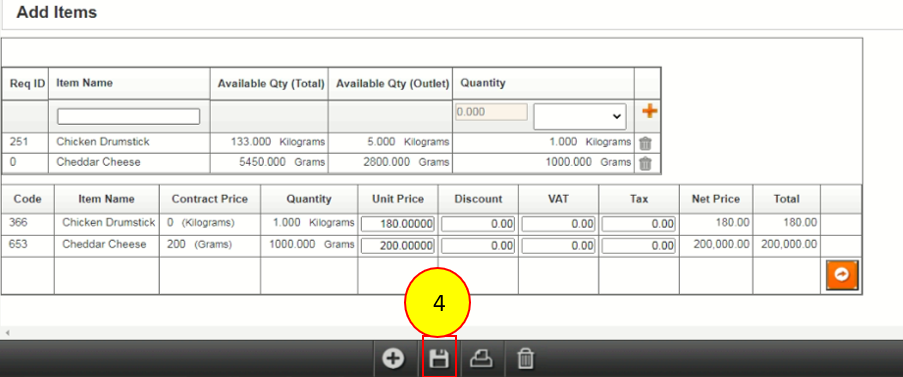
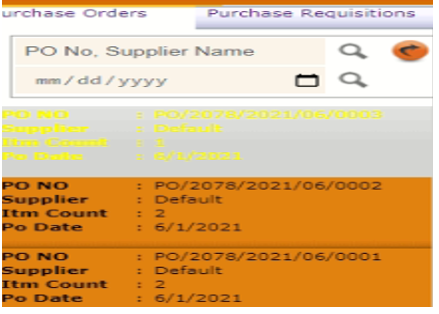
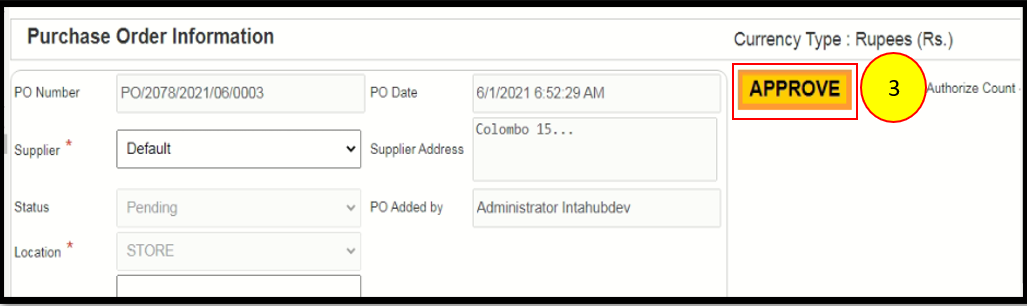
Access to Purchase Order Select the created purchase requisition. Select plus mark No.3 and add the PR to the PO Select save button No.4 to save the added items.
Access: In order to create the purchase order user needs to select the created PR and then need to do the required changes and save the purchase order.
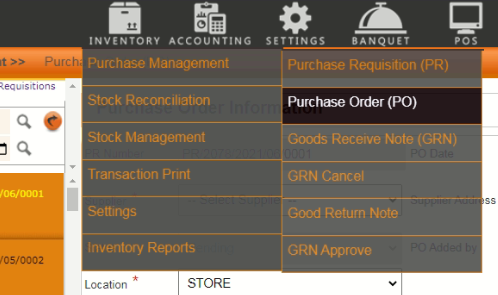
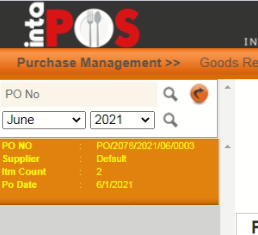
Location: Dashboard >> Inventory >> Purchase Management >> Purchase Order
Mean:After creating purchase order employee needs to approve the purchase order.
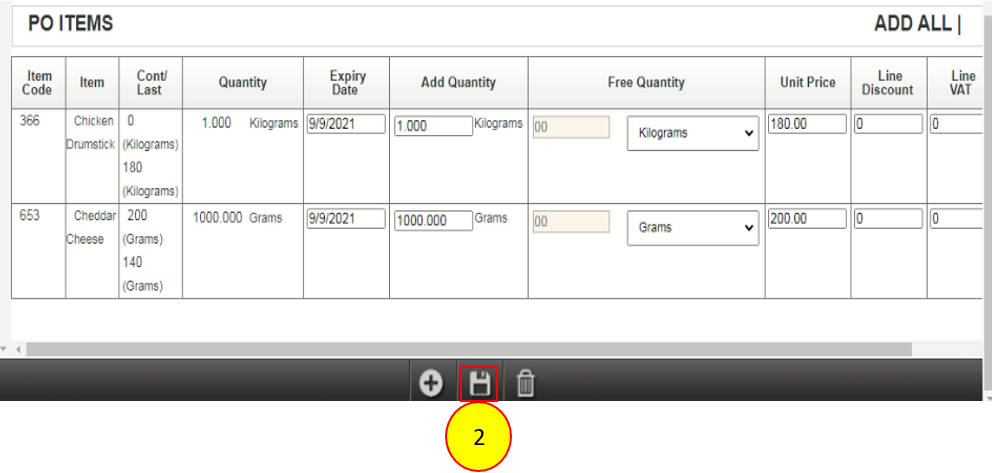
Select the GRN Select the PO Add quantities and free quantities to the PO items. Select save button No.2 to save the PO items.
Access: In order to approve the PO user needs to select the PO and then needs to select the approve button.
Location: Dashboard >> Inventory >>Purchase Management >> Purchase Order >> Approve PO
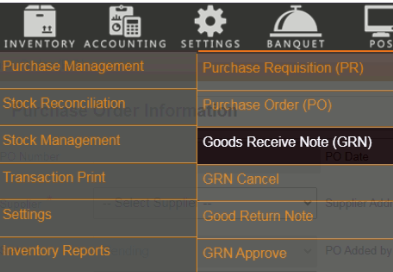
Mean:A goods receipt note (GRN) is created to record the delivery of items from your suppliers. A GRN is created against an issued purchase order.
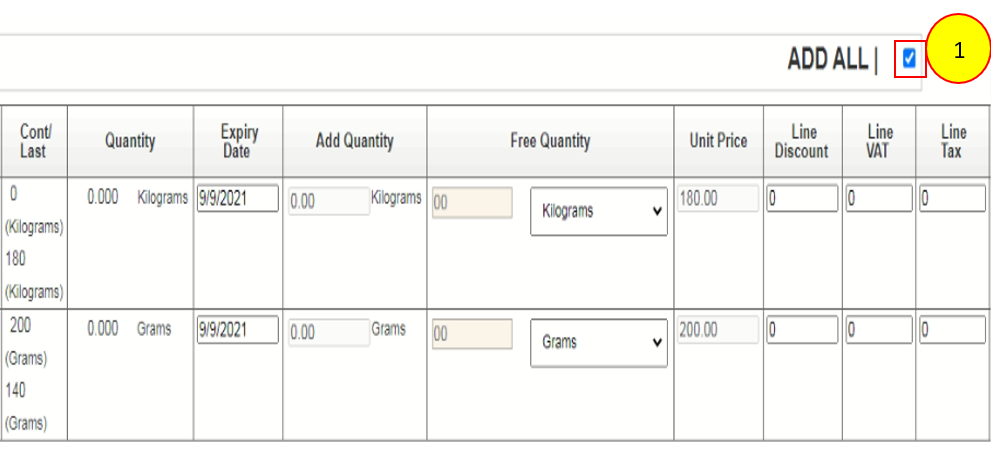
Select the PO Select add button No.1 and delete button No.2 to add and delete items before approve the PO Then Select the approve button to approve the PO
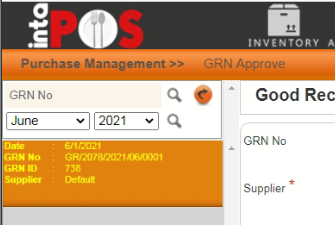
Access: In order to create the GRN user needs to select the Inventory then purchase management then the GRN
Location: Dashboard >> Inventory>>Purchase Management>> GRN
Mean:If the GRN is with the required quantities and items the authorized employee has to approve it.
Select the GRN Received items are loaded to the screen. Select approve button No.1 to approve the GRN.
Access: In order to approve the GRN user has to select the required GRN then only user can approve the GRN.
Location: Dashboard >> Inventory >> Purchase Management >> GRN >> Approve GRN.

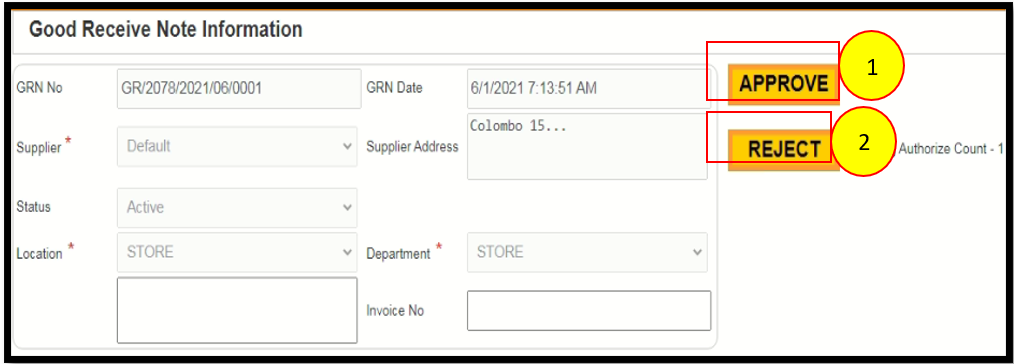
If user needs to reject the GRN, user can select reject button No.2 GRN option.
Mean: After creating goods receipt note (GRN) user can return the quantities or items using good return note
Select the good return note. Add the return quantity and select save option No.1. Entered return quantity will display on the table
Access: In order to create the good return note user needs to select the good receive note and add the return items and quantities to the good return note.
Location: Dashboard >> Inventory>>Purchase Management>> Good Return Note
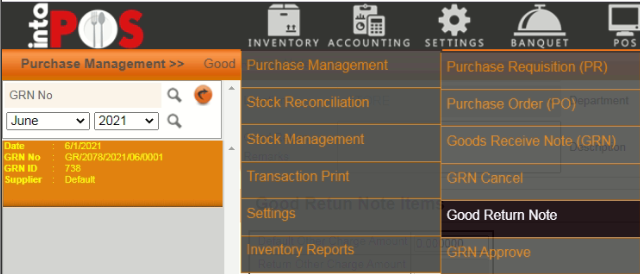
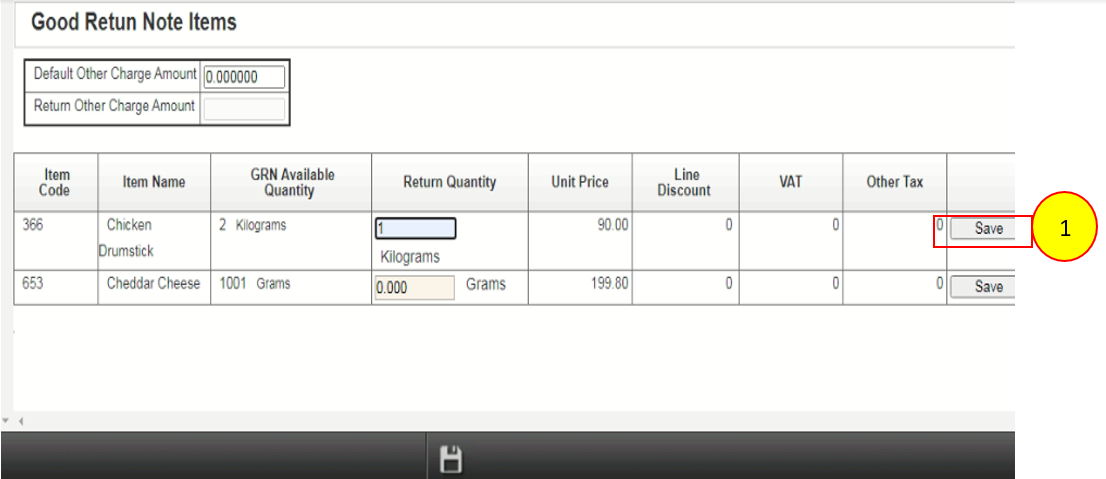
And then select the save option No.2 to save the good return note
The login window appear first when you trying to log in to the BANQUET module. Enter valid user name and password to login as shown below.
After logging in to the system by using valid user name and password, this main window will appear. This is shown below. You have the option of using the Banquet module on this main dashboard. As well as this window provides you the option of logging out, when you need to log out from the system
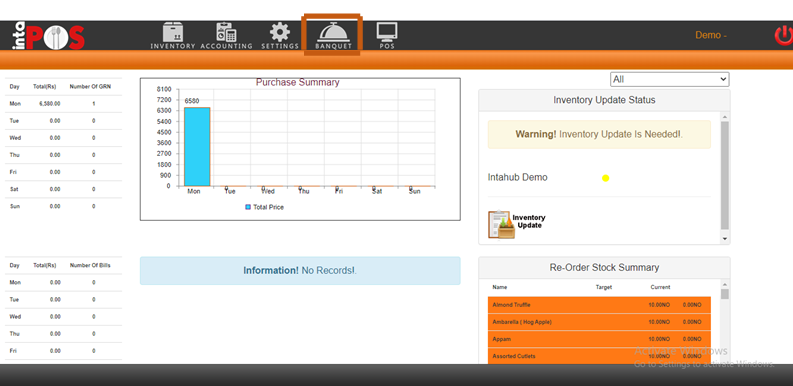
The following things are contained in our Banquet module
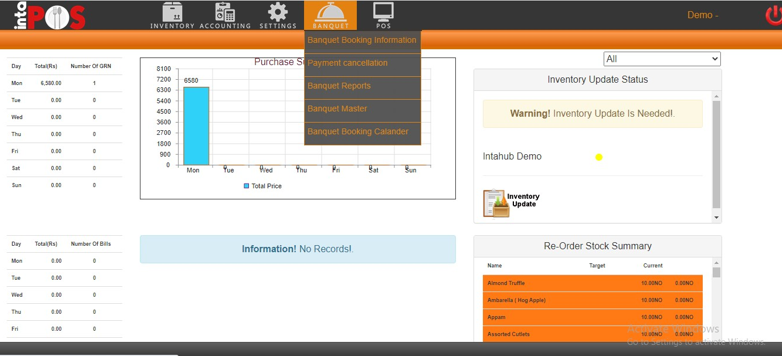
Different types of packages including the food items for the particular package could be created from this.

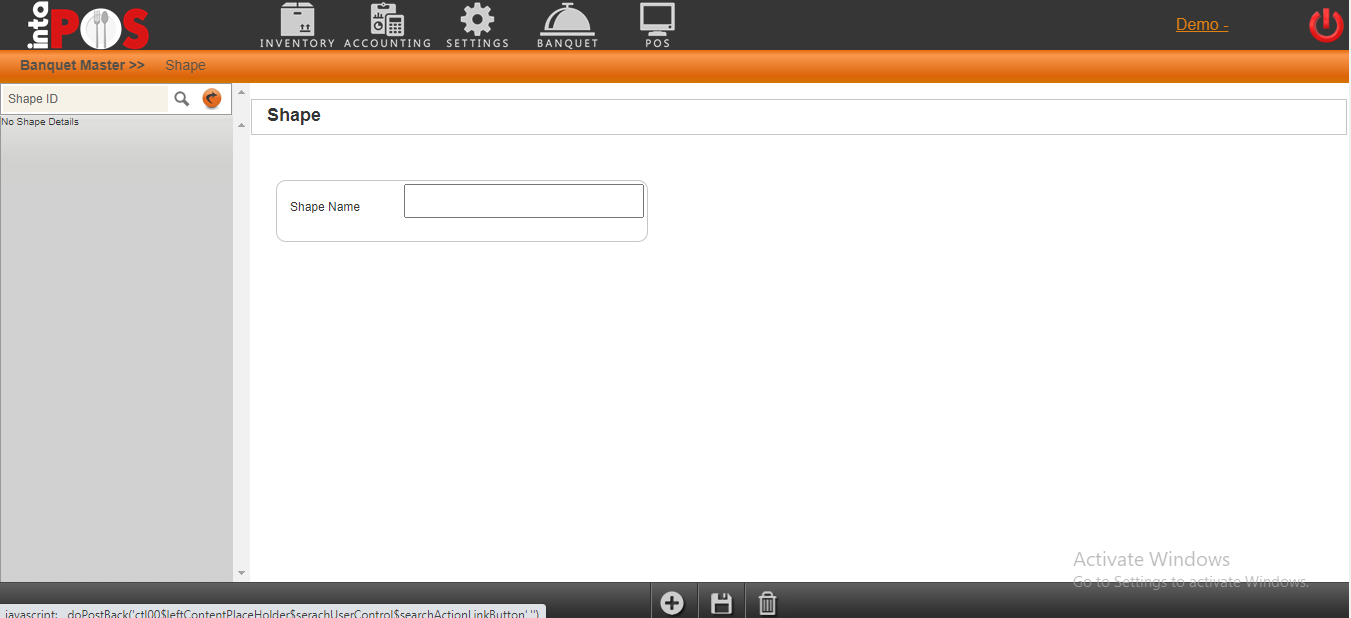
The shapes for the banquet venue are created through this option.
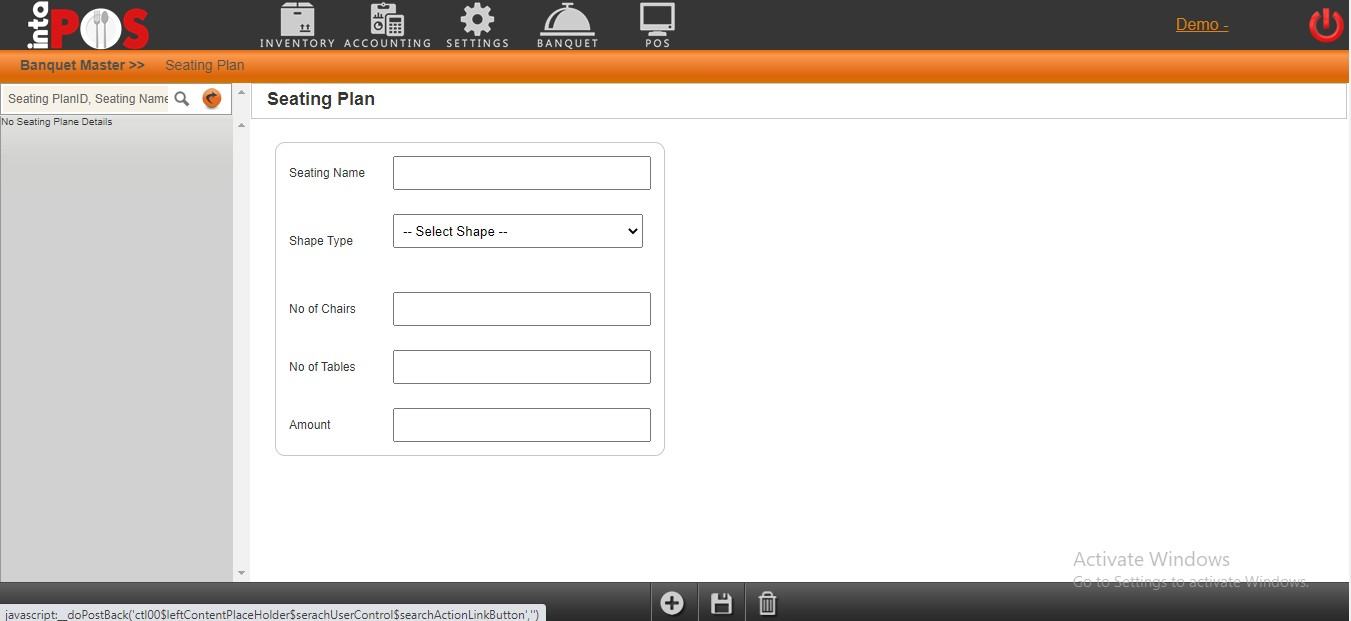
The different types of seating plans which you have could be created through this option.
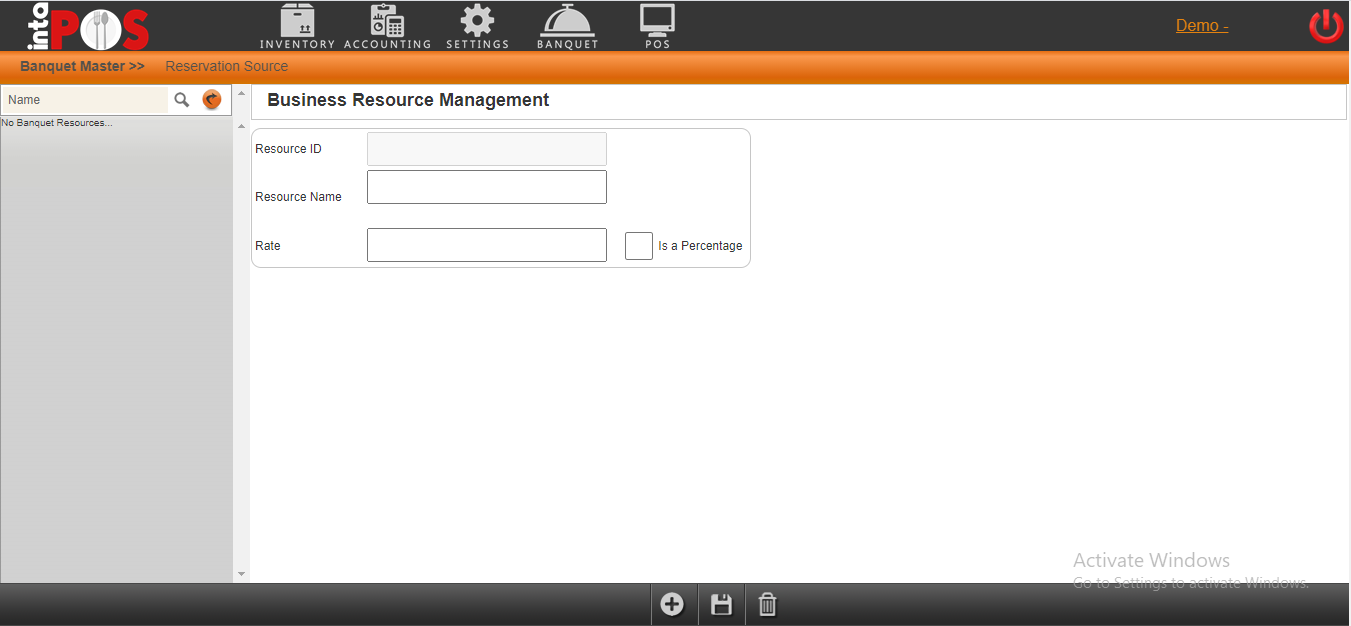
You could be getting your reservations from various ways. We have the reservation source option to configure to the system those different ways so that you get the option of selecting it upon making a reservation.
Mean:Calendar reservation means reserve a table using calendar option for current or future time slot.
Access: In order to perform calendar reservation in the Restaurant POS please follow the following steps.
Location: Dashboard >> calendar
Mean: When customer enter into the restaurant for reserved order. The Calendar reservation needs to be Checked-In to add items to the order or make payments.
Access: In order to perform calendar reservation checked-in the Restaurant POS user required to select calendar reservation from the dashboard.
Location: Dashboard >> Calendar Reservation
Mean: Placing a takeout order mean if a guest is not dinging and need to take food item from restaurant outlet and go away. It is mean a takeout order.
Access: In order to perform a takeout order in the Restaurant POS selects the Take-Out option from the dashboard.
Location: Dashboard >>Take Out
Mean: Settling a bill means paying for an order. Here to settle a bill not only one payment method but also the different multiple payment methods can apply.
Access: In order to perform a multiple payment bill settlement in the Restaurant POS access the dashboard and then select payment option.
Location: Dashboard >>Payment
Mean: Placing a takeout order mean if a guest is not dinging and need to take food item from restaurant outlet and go away. It is mean a takeout order.
Access: In order to perform a takeout order in the Restaurant POS selects the Take-Out option from the dashboard.
Location: Dashboard >>Take Out
Mean:Duty meal provide for the employees of the restaurant. It needs to record with the employee’s name.
Access: In order to perform a duty meal settlement in the Restaurant POS please follow the following steps.
Location: Dashboard >>Payment
Mean:Duty meal provide for the employees of the restaurant. It needs to record with the employee’s name.
Access: In order to perform a duty meal settlement in the Restaurant POS please follow the following steps.
Location: Dashboard >>Payment
You need to use the front office login link to login to Boost Absolute Front Office and manage the daily tasks at your hotel.
As soon as you login to the front office, you will notice the simple yet detailed screen view to manage your hotel. There are in all 2 different views in which you can view the property details using Boost Absolute.
1. Stay View
2. Quick View
Let us see what all these views show and how to comprehend it to manage the tasks more efficiently.
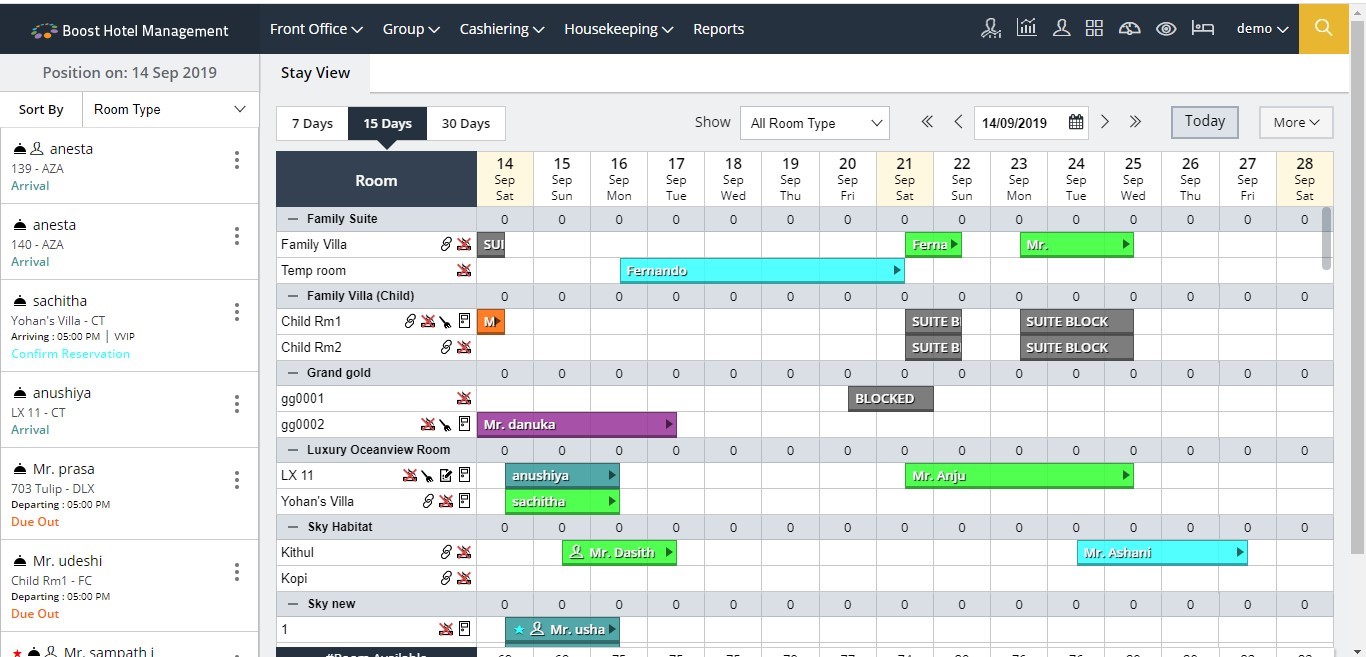
As soon as you login to IntaPMS Front Office, you will notice the Stay View, which on a single screen displays a complete status of your property/hotel.
The Stay view is designed to make your work simple and easy.
• It is actually a graphical representation of the guest ledger that shows the current status of the rooms in your property.
• You can directly work on it and perform various actions as required.
• The Room Types with Room numbers (or names) are listed in the first leftmost column of the Stay View screen.
• As you view from top to bottom, the Room types and the rooms are displayed with few other icons placed next to room number saying something more about the room. As for example, Room number 105 has 1icons.
o The first icon says that this room is a Non-Smoking room. If you have allowed smoking in the room, the icon will be shown as
• Each cell in front of the room denotes a room-night, and shows its status.
• The different colors of these cells indicate different status like Arrival, Checked Out, Due out, Confirmed Reservation, Maintenance Block, Stay Over, or Day Use, for the room which can be changed to your preference from the configuration console.
• Click on the calendar icon located in the top right corner of the stay view to change the dates for the stay view
The left most block of the stay view screen on the Front Office console of IntaPMS, lists all the rooms with the guests name for which they are reserved with the - to the minute status - of those rooms. To perform any operation on any room listed here in this list, simply double click on it and you will be given a list of quick operations. Select the task that you want to perform by selecting it from the list.
The options you get are:
• Edit Transaction (explained in detail later)
• Room Move (allows to move the guest to a different room)
• Set Message (allows taking a message for the guest. This will reflect in Edit
• Transaction screen >> General Information tab.)
• Set Tasks (allows entering a task for the front office or the housekeeping to be taken as per the alert selected for the set date and time. This will reflect in Edit Transaction screen >> General Information tab.)
• Set Preference (allows entering preference of the guest, if mentioned by the guest.
• This will reflect in Edit Transaction screen >> General Information tab.)
• Amend Stay (allows to change the stay of the guest in this room.)
• Check In (reflects only when a room is in “Confirmed Reservation Status”)
• Cancel (reflects only when a room is in “Confirmed Reservation Status”
• Mark No Show (reflects only when a room is in “Confirmed Reservation Status”)
• Exchange Room (allows to switch rooms between two guests)
• Void Reservation (reflects only if the guest is not checked in)
• Print Invoice (allows to print invoice for guests)
We have gone through all the operations that can be performed using IntaPMS, except for the “Edit Transaction” option that you get when you click on the room. Let us now see in detail as to what can be managed when you are on the Edit Transaction screen of a room.
This option is used mostly to manage a room. This screen will give all the options that a front office user will require to manage a room. When you click on “Edit Transaction” option on any room, you will be guided to the screen where you see the details of the guest staying in the room.
The “Edit Transaction” screen is divided in to 2 parts, one which displays the guest information, stay information and other information like reservation type (if apply), business source information, market information, travel agent information and the company to which the charges might be billed to.
.
The top right corner of the screen will display the status of the room selected.
Towards the bottom of the screen, you can see the “Audit Trail” for the actions performed
on this room along with the options to save and cancel the changes made to the screen.
The other half screen has 3 tabs which allow accessing different information related to this room and the guest and also allows performing various actions related to the room and the folio generated for this room.
This tab displays different information like – Billing information, sharer information, remarks entered for the room, and charge summary which shows the total charges, total credits and the balance on the room. If you scroll down you can also see the “Audit Trail” for the actions performed on this room. You can make changes to the above-mentioned information and save the changes too.
You will notice small icons of positive sign on Sharer Information block, Remark block and Inclusion block.
This when clicked will allow you to add the information to respective blocks.
The Billing information block will display and allow you to make changes to the billing information for this room like whom should the folio be billed to (guest or company), type of charge(cash or credit), payment method, and many other things.
The Sharer Information block shows the name of the person sharing the room along with the actions that you can perform like – editing the details, take pick up & drop off time, view and print the Guest Registration card, and add the guest to black list.
The inclusion block will allow you to enter the details of any extra charge that you want to post to this room with the option to enter the charge, posting rule and charge rule. You can also select the folio from the drop down list if there is more than one folio created for this room.
The messages, tasks and preferences that you take for a room are displayed below the Inclusion block with the number of entries in the bracket for each particulars.
This tab shows the folio details of the room as well as gives ample options to perform operations on the folio.
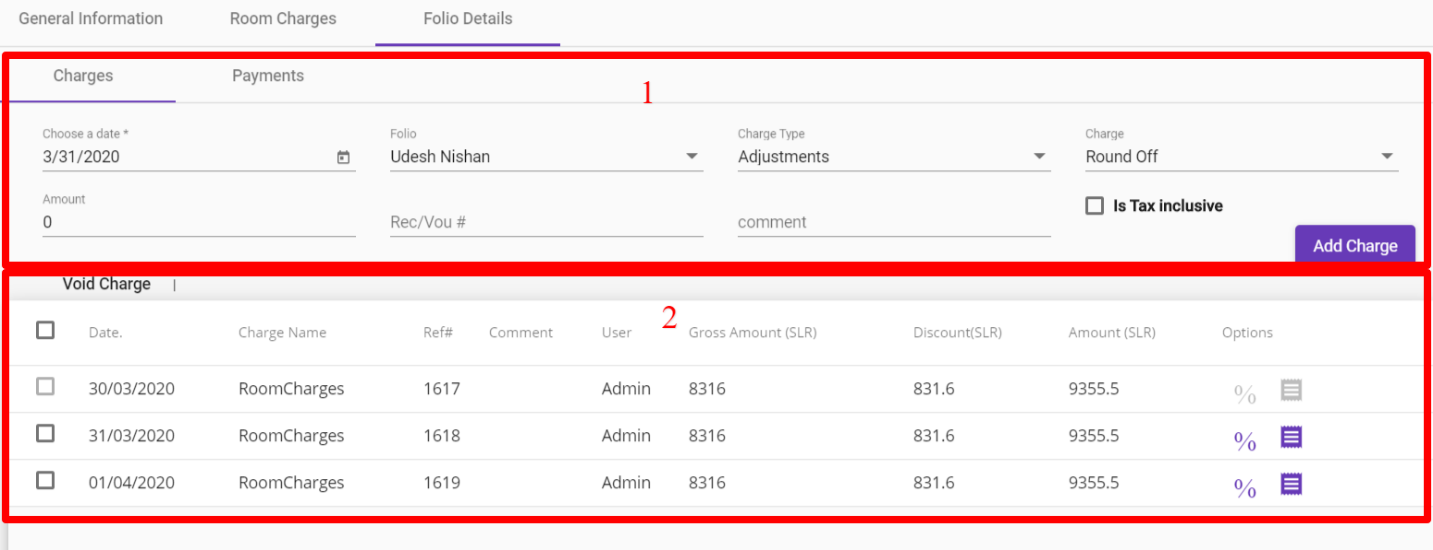
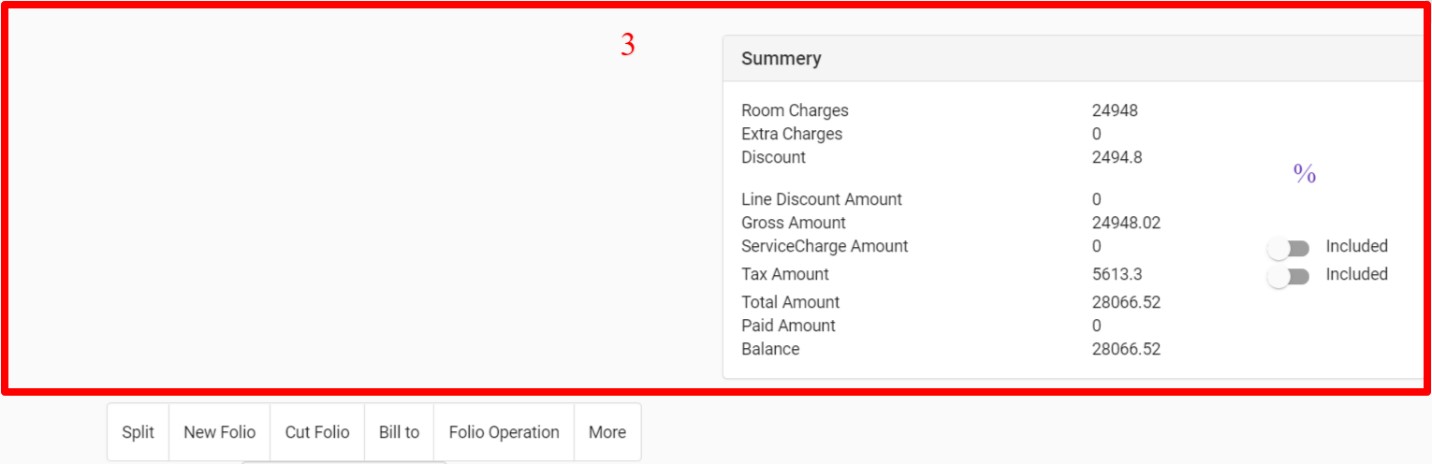
Group 1 helps to post a charge on the folio by selecting the options from “Type” field. You can take a payment, post an extra charge, make adjustments, post room charges, transfer the charges to another folio, or post the charges to city ledger account.
Select the type; enter the amount, voucher or receipt number, comments if required. Select the folio and click on ADD.
Group 2 is the folio listing which shows all the charges on the room which will be printed on the folio.
• Void – Select the entry of charge from the above list and click on this option to void the charges.
Group 3 is the group of options which will allow you to take further action on the folio as per the requirements.
You can perform the actions using the buttons provided as explained below.
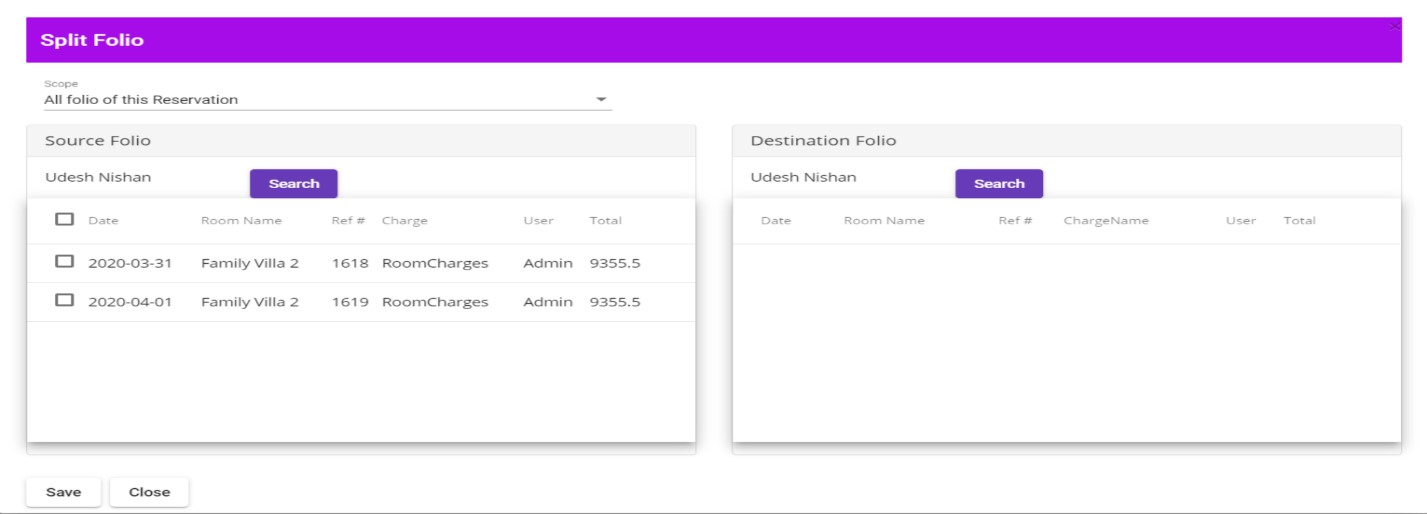
• Split Folio – Click on this option to split the folio or to transfer the selected charges from this folio to another. When clicked on this option, a window pops up with the list of charges on this folio and an option to select the charges of the folio, guest or the entire group. First, select the appropriate option on the source folio and then on the destination folio click on search option to select the destination folio. Click on the arrows in the middle of the screen to transfer the selected charges to complete the action.
• New Folio – Click on this option to create a new folio either in the name of the sharer staying in the same room or anyone else staying in the hotel.
• Cut Folio - Click on this option to erase all entries on a specific folio.
• Bill To – Click on this option to transfer the balance on this folio to any other. It may be the sharer staying in the same room or anyone else staying in the hotel.
• More drop downs:
o Tax Operation – this option allows to Exempt or Assign different taxes for room charges
o Tax Operation on Extra Charge – this option allows to Exempt or Assign different taxes for extra charges.
o Folio Routing – this option allows you to route specific extra charges or room charges to a separate folio.

• Upload Files – This option allows you to upload content of the guest such as Guest images, Passport copy etc.
• Print Invoice – This option allows you to view and print invoices in different currencies.
• Audit Trail – Allows to check log entries of the users who made changes to the folio.
Room charges tab, as the name says helps to list and manage the room charges

You can manage the rate offered, rate type offered, pax information and discount from this screen. To change or update any information, simply click on the respective icon in the “Action” column for the date you want to make the changes to, the resulting field will be activated to enter the changes.
Select the action by selecting the radio button to apply the changes to selected dates, or if you want to apply the changes to the whole stay. Once selected, click on apply
• In the stay view, Click (left-click) in front of the room-type, on the cell under the desired Check-in date, and drag the mouse (with the button pressed) till the Check- out date of your booking.
• An orange color bar will extend as you select which will show you the number nights selected along with a tool tip showing the arrival date and the departure date as per your selection.
• As soon as you release the left click on the mouse, it will open a Walk-in/Reservation form.
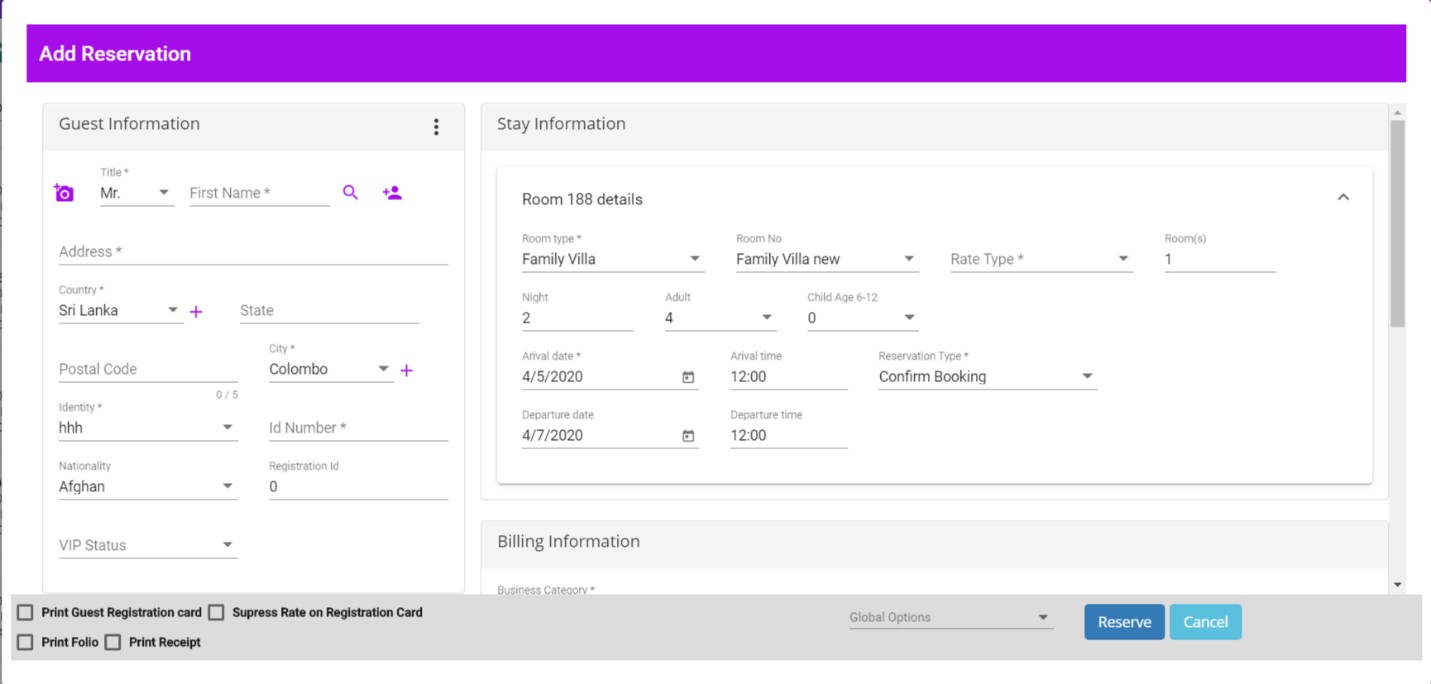
• Enter the stay information and the Billing information.
• The room type and the room number will be pre filled as per the selection you made on the stay view
• Select the rate type; enter the adult/child information, name of the guest and the identity information.
• Click on Reserve.
• Let us now go through the options given under the top most part of the Front Office console in IntaPMS.

There are 5 buttons on the top panel of Front Office console in IntaPMS. Each one drops down to show more options when hovered with your mouse.
• In the stay view, Click (left-click) in front of the room-type, on the cell under the desired Check-in date, and drag the mouse (with the button pressed) till the Check- out date of your booking.
• An orange color bar will extend as you select which will show you the number nights selected along with a tool tip showing the arrival date and the departure date as per your selection.
• As soon as you release the left click on the mouse, it will open a Walk-in/Reservation form.
• Enter the stay information and the Billing information.
• The room type and the room number will be pre filled as per the selection you made on the stay view
• Select the rate type; enter the adult/child information, name of the guest and the identity information.
• Click on Reserve.
We all know that Night Audit is the most important part of the hotel management. Night audit is the process by which we do the day close for the system; it allows the user to change the working date for the software. This process is necessary because it gives users a clear status of what all activities were performed during the day. This can be quickly monitored by the management. It is recommended that this operation be performed by a night auditor or by a user from the Management level.
Night Audit in IntaPMS is performed in 6 simple but important steps listed below:
Step 1 of 6: Pending Reservations
The first step checks for any pending reservations for the day which is currently showing as the working date on IntaPMS. If there are any reservations at all, that may need your attention, they will be listed here with all the basic details along with the “drop down arrow” asking for the necessary action to be taken on the pending reservations. You can void, cancel, mark as No show or do a check-in for the reservation listed as appropriate.
Take the required action, save the changes and click NEXT to move ahead to the next step of the Night Audit.
Step 2 of 6: Release Reservations
This step is for releasing/cancelling the reservations that did not show up for the day which is currently showing as the working date on IntaPMS. The ‘Drop down arrow’ will have the option to cancel the reservation if any are listed on this screen.
When cancelling the reservation, the system gives you the option to charge the cancellation fees and select the reason for cancelling the reservation. Enter the details, save the changes to move on to next step of the Night Audit.
Step 3 of 6: Room Status
This screen will list all the occupied rooms with the guest names along with the arrival and departure information, balance and the room status. The Drop down arrow here on this screen has the options to either amend the stay or do a check out.
The check-out can be performed on zero balance rooms directly from here. If the room balance is non-zero, you will have to go to the room, clear the outstanding balance and then check out the guest from the room.
Take the required action, save the changes and click NEXT to move on to the next step of the Night Audit.
Step 4 of 6: Unsettled Folios
screen will list all the folios with a non-zero balance. The $ icon gives a user the option to settle the folios by redirecting the user to the folio detail screen.
Take the necessary steps, save the changes and click NEXT to move on to the next step of the Night Audit.
Step 5 of 6: Nightly Charge posting
This screen will list all the occupied rooms with the guest names and the folio numbers along with the description and the amount of the night charge for the working date displayed.
You can select the rooms, that you want the charges to post or simply do a ‘select all’ and click on “Post” button to post the charges to the listed rooms. Once the required action has been taken, click on next to move on to the final step of the Night Audit.
Step 6 of 6: Create New Day
The last step creates a new day by ending the day for which you were doing the Night Audit. After the Night Audit is completed, the data for the last working date will freeze.
Once you agree to this and click on Finish button, the Night Audit wizard closes and the working date on the Front Office console of Boost Absolute changes to a new date.
Net Locks
Net Lock is a feature to protect two or more guests to check in the same room at same time. This feature can be very useful when the software is accessed from various terminals simultaneously. The desk clerks will not be allowed to perform transactions on the same room at the same time from different access points. As soon as one particular room is opened from any other terminal in the network, the software blocks the access to that room with a message that another user is already accessing this room
To unlock the net lock, click on this option, select the room that needs to be unlocked and click on Unlock.
This option gives you the facility to store and manage the travel agent database. This list will also reflect under the business source selection list while taking a walk-in, reservation or booking.
Apart from the regular search options to search a travel agent from the list, the screen also allows you to add a new travel agent.
You can either edit or delete the already listed travel agent information by clicking on the Travel Agent row.
When the mouse hovers on ‘Cashiering’ button, it will drop down a list with below mentioned options.
This screen lists all the work order created for the housekeepers against the rooms along with the options to either edit the work order or enter a note for the work order.
To add a work order for a room, click on the “Add Work Order” button in the top right corner of the screen and add the details of the work order along with the details of the housekeeper it is assigned to.
This screen lists all the rooms that are blocked along with the reason.
The screen also provides edit option for each listed room to either edit the details or un-block the rooms.
If you want to add a room to the block list, click on the “Add Block Room” button in the top right corner of the screen and add the details of the room and the duration for which you want to block it.
You need to use the front office login link to login to Boost Absolute Front Office and manage the daily tasks at your hotel.
As soon as you login to the front office, you will notice the simple yet detailed screen view to manage your hotel. There are in all 2 different views in which you can view the property details using Boost Absolute.
1. Stay View
2. Quick View
3. Dashboard View
Let us see what all these views show and how to comprehend it to manage the tasks more efficiently.
As soon as you login to IntaPMS Front Office, you will notice the Stay View, which on a single screen displays a complete status of your property/hotel.
The Stay view is designed to make your work simple and easy.
• It is actually a graphical representation of the guest ledger that shows the current status of the rooms in your property.
• You can directly work on it and perform various actions as required.
• The Room Types with Room numbers (or names) are listed in the first leftmost column of the Stay View screen.
• As you view from top to bottom, the Room types and the rooms are displayed with few other icons placed next to room number saying something more about the room. As for example, Room number 105 has 1icons.
o The first icon says that this room is a Non-Smoking room. If you have allowed smoking in the room, the icon will be shown as
• Each cell in front of the room denotes a room-night, and shows its status.
• The different colors of these cells indicate different status like Arrival, Checked Out, Due out, Confirmed Reservation, Maintenance Block, Stay Over, or Day Use, for the room which can be changed to your preference from the configuration console.
• Click on the calendar icon located in the top right corner of the stay view to change the dates for the stay view
The left most block of the stay view screen on the Front Office console of IntaPMS, lists all the rooms with the guests name for which they are reserved with the - to the minute status - of those rooms. To perform any operation on any room listed here in this list, simply double click on it and you will be given a list of quick operations. Select the task that you want to perform by selecting it from the list.
The options you get are:
• Edit Transaction (explained in detail later)
• Room Move (allows to move the guest to a different room)
• Set Message (allows taking a message for the guest. This will reflect in Edit
• Transaction screen >> General Information tab.)
• Set Tasks (allows entering a task for the front office or the housekeeping to be taken as per the alert selected for the set date and time. This will reflect in Edit Transaction screen >> General Information tab.)
• Set Preference (allows entering preference of the guest, if mentioned by the guest.
• This will reflect in Edit Transaction screen >> General Information tab.)
• Amend Stay (allows to change the stay of the guest in this room.)
• Check In (reflects only when a room is in “Confirmed Reservation Status”)
• Cancel (reflects only when a room is in “Confirmed Reservation Status”
• Mark No Show (reflects only when a room is in “Confirmed Reservation Status”)
• Exchange Room (allows to switch rooms between two guests)
• Void Reservation (reflects only if the guest is not checked in)
• Print Invoice (allows to print invoice for guests)
We have gone through all the operations that can be performed using IntaPMS, except for the “Edit Transaction” option that you get when you click on the room. Let us now see in detail as to what can be managed when you are on the Edit Transaction screen of a room.
Mean:Calendar reservation means reserve a table using calendar option for current or future time slot.
Access: In order to perform calendar reservation in the Restaurant POS please follow the following steps.
Mean: When customer enter into the restaurant for reserved order. The Calendar reservation needs to be Checked-In to add items to the order or make payments.
Access: In order to perform calendar reservation checked-in the Restaurant POS user required to select calendar reservation from the dashboard.
Mean: Settling a bill means paying for an order. Here to settle a bill not only one payment method but also the different multiple payment methods can apply.
Access:In order to perform a multiple payment bill settlement in the Restaurant POS access the dashboard and then select payment option.
Mean: Settling a bill means paying for an order. Here to settle a bill not only one payment method but also the different multiple payment methods can apply.
Access: In order to perform a multiple payment bill settlement in the Restaurant POS access the dashboard and then select payment option.
Location: Dashboard >>Payment
Mean: When the same bill needs to be separate for different bills this split bill option can be used.
Access:In order to perform a split bill user needs to go to the saved order and select the split bill option.
Mean: System facilitate to deposit an advance of a customer for a specific order.
Access: Select the payment option of the dashboard and then select the advanced deposit option to deposit the advance amount.
Mean: User can use order cancellation option to cancel an order according to the internal or external customer request.
Access: Select manager option of the dashboard and select the order cancellation option to cancel the order.